Refreshed ShipBlink Onboarding and Dashboard UI Experience

We’re excited to announce major improvements coming to the ShipBlink dashboard! We aim for ShipBlink to be the best all-in-one shipping app for ecommerce merchants, and that starts with the platform that connects us to you. This update will improve merchant efficiency by reducing the time spent onboarding and managing your ShipBlink account.
So what’s new with ShipBlink?
Updates include a streamlined onboarding checklist, consolidated dashboard, and more.
Streamlined onboarding checklist
We understand that our merchants are juggling multiple storefronts and need to quickly get back to their business. The new onboarding checklist will enable new and existing ShipBlink users alike to easily set up their shipping solution in less than five minutes.
Reorganized settings to simplify account management
ShipBlink users can now manage their Carrier Accounts and Billing right from the ShipBlink dashboard. What does this mean? New ShipBlink users do not need to create an EasyPost account and can manage their Carriers and Billing from one platform instead of two.
Existing ShipBlink accounts will also benefit from this; however, they’ll still need to log in to EasyPost to manage their Billing Payment Methods if they’re using Discounted Carriers or Insurance.
Depending on when you created your ShipBlink account, there will be minor differences in where you’ll find the settings to manage your account. To make this transition easier, we’ve created a simple table for you to refer to below.
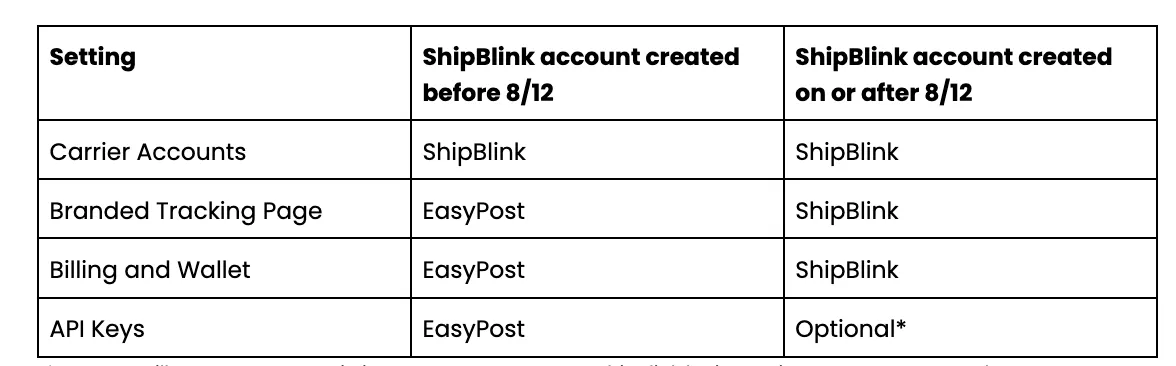
*You can still connect a pre-existing EasyPost account to ShipBlink by importing your EasyPost API keys. However, this is not required to use ShipBlink. For more details see our support article
Brand new features and renamed ones
ShipBlink users who need support can access our new Help Center, generate reports for Payment Logs and Adjustments from the dashboard, and create branded trackers for their shipments.
We’ve also renamed the following menus to be more user-friendly:
- Parcels => Saved Packages
- Warehouses => Addresses
These two menus enable you to reduce the time spent creating a label. In Saved Packages, you can save predefined package settings. This is great if you consistently use the same size packages, as it removes the need to input the dimensions manually.
The Addresses menu has a similar benefit, allowing you to save common From and Return addresses for your business.
How to get started with ShipBlink
Ready to optimize your ecommerce shipping? ShipBlink is here to help you manage all of your storefronts from one platform, drastically reducing cost and time. Here’s how you can get started.
New user
- Install ShipBlink from your storefronts App page (Shopify, BigCommerce, eBay, WooCommerce).
- Connect your store to ShipBlink.
- Adjust your ShipBlink settings to match your preferences (carriers, parcel sizes, tracking page).
- Ship away!
Current EasyPost user
- Install ShipBlink from your storefront App page (Shopify, BigCommerce, eBay, WooCommerce)
- Connect your store to ShipBlink.
- While adjusting your ShipBlink settings, make sure to copy your EasyPost Production and Test API keys and paste them into ShipBlink
- Ship away!
If you have any questions regarding this update or how to get started, please reach out to us at support@shipblink.com.